

What are the basic steps for taking an inventory of the library collection?
Basic steps for inventory
The following steps outline a general sequence of steps in taking an inventory. Please note that if your library has a large number of items, you may wish to make a selection, such as item type or location, and follow the steps for each part of your collection.
1. Run the Set Inventory Date (initinv) report. This report marks items currently charged as inventoried. The report is in the Scanner, Administration, or All Inventory groups. You may wish to make selections based on the portion of the collection you are doing, and you may wish to exclude items charged to LOST, MISSING, or other pseudo-patrons whose items should not be counted as part of the inventory.
2. Use the Inventory Item Wizard, PocketCirc device, and/or a portable scanner to scan the barcodes of the items in your collection. For more information on using the portable scanner, please refer to the WorkFlows Help Topic "FAQ: Making an Inventory."
3. Once all items have been scanned, run the List Inventory by Item Number (invlist) report. This report will list items that were not marked as inventoried during your current inventory. If you have inventoried your collection before, you will need to run the report twice: once with the selection of "date inventoried: NEVER" and once with a date inventoried date selection that is just prior to the date you started your current inventory. If this is your first inventory, you will only need to run the report with a date inventoried selection of NEVER. You may also wish to exclude items with a current location of LOST, MISSING, etc., or number of charges > 0.
4. At this point, the library may wish to double-check the shelves to look for any items not inventoried.
5. When the site is ready to declare uninventoried items missing, run the Charge to Missing (setmissing) report. Make the same selections as in the invlist report. This report will check out any of the items still not inventoried to the MISSING user.
6. Although items can remain charged to the MISSING user as long as needed, some sites prefer to discard items not found within a reasonable amount of time after the inventory. Run the Convert DISCARD items (cvtdiscard) report. This report discharges the items from the MISSING user and changes their location to discard. If sites need a list of items they are discarding, they should run the List Items report with the selection of current location: DISCARD before proceeding to the next step.
7. Items can remain in the discard location as long as needed. When a site is ready to remove the items from the system, it should run the Remove Discard Items (remdiscard) report. This report will delete from the system all copies with a current location of DISCARD. It will also remove the title record if all copies of the record are removed.
CAUTION: Sirsi recommends performing a full-system backup prior to running this report.
We also have an Inventory training manual.
Expand Training and proceed to the WorkFlows section to find the Inventory (Unicorn 2003) guide.
OCLC Documentation for HOLDS MANAGEMENT
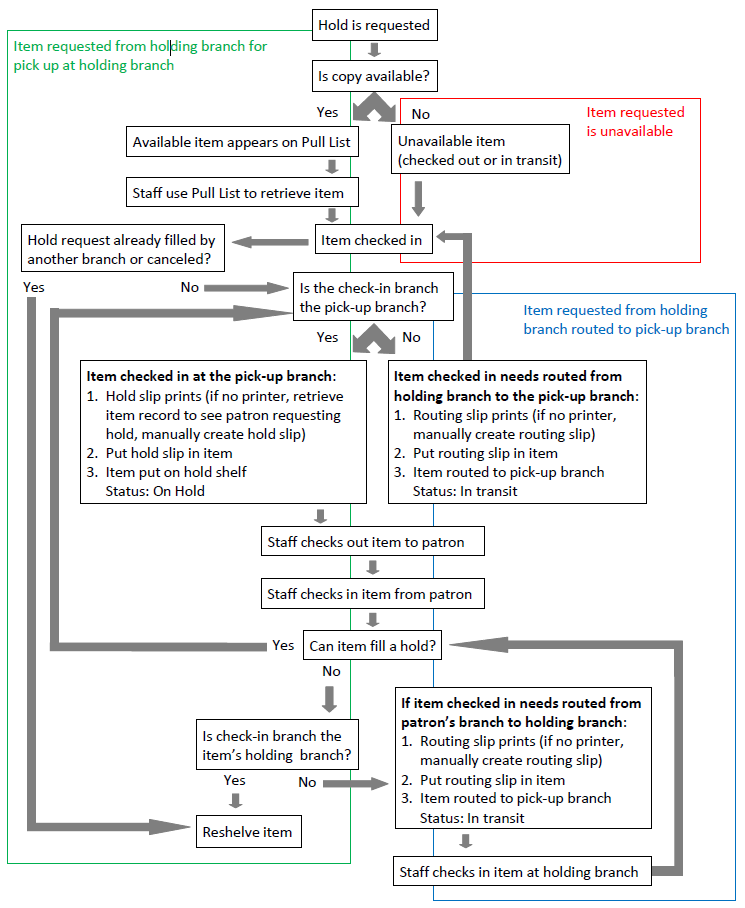
OCLC WorldShare Management Services (WMS) holds process manages requests for library materials, from a patron placing a hold to library staff retrieving and preparing the item. The exact workflow can vary depending on whether the item is available immediately, is checked out, or needs to be routed from a different branch.
The holds process for available items
The holds process for unavailable items
The holds process for multi-branch libraries (group holds)
Additional hold options and features
WMS offers many configurable features to manage holds:
To Review Long Overdue Items, first run the analytics report found in WMS.
Analytics >> Classic Reports >> Circulation >> Overdue Items Aging Report

Download the report and open with associated application i.e. Excel.
Find the barcode you want to review 0195501597445.
In WMS select Circulation >> Discover Item and enter the barcode to search using keyword index.

View Item

You can review multiple options found on the top right of the Details screen for this item. Please note the links do not appear clickable but they are.

Details:
Statistics:

Transaction History:
![]()
Notification History:

Item Change History:
Overview of Withdrawn Status and deleting and item in WMS.
From WMS Circulation select Discover Item and scan barcode
Click Delete found in the upper right corner and respond to prompt:

Once you delete and item it will be retained in the system for 1 year, however, the OCLC holdings will be removed automatically, and the catalog will update within two days of withdrawing the item.
If you scan the barcode again WMS Circulation select Discover Item it will show Withdrawn at the top of the item information.